Categories

Showing posts with label Nouvic Clock Journey. Show all posts

Thursday, 8 December 2011

Nouvic Clock Journey Part 8

Render scene and final touches.

1.


2. Same lighting from before and I forgot to turn off the “cast shadow” function on the wall box.

3.

 4.  The shadows look noisy because I haven’t increased the shadows and shadow depth in the Raytrace option because this enabled me to cut down on render time (I will increase it when I think its just right).

 5. Started playing with the light colour. Blue left, Yellow middle (cast shadow) and Red right. I learnt that the light to the left and right affects the middle shadow.

 6.  Yuk! So I used blue left, green middle and red right.

 7. Now Light Blue (innocence), Middle Pink (passion) and Red (love). I went with colour emotions. One colour can mean different things like Red for instance love, blood, gore, stop and more.

 8. Red(love) , Green (nature) and Orange (warmth). Hmmm… time to really play with the colours to get it just right for the theme.

 9. I think I might have a winner. Green (natural), Orange (warmth) and Red (passionate)


10. Hmm… It looks slightly different from the other side because of the position of the light (this image has also been enhanced in quality).

 11. Time to increase shadows, shadow depths, resolution and viewed from different camera angles.


This one is my favourite because of the flowing wood carvings has a gradient of green and red that complements the wood texture. The yellow just gives it that extra shine. The knowledge I have gained from this project has got me excited for my next project.
218 tri clock and 4 tri clock hands.

Nouvic Clock Journey Part 7


I found a really interesting Normal Mapping tool called Ndo

1. But first I need to change the clock hand material to a Lambert because the transparent areas were reflecting light. I then positioned the hands on the clocks face.


2. First stage (optional) was to change it into black and white by using the black and white tool or Hue/Saturation.

 3. I then tampered with the exposure tool (this maybe a mistake but it’s all experimental). I had already installed it into Photoshop so it should show up in the macro section. I then press play and bam! It was turned into a normal map and a menu popped up.

 4. This is what it looked like. I’m extremely new at this software so bare with me. The menu is there to change the normal map to whatever normal map you like (It’s just a matter of learning by trial and error).
 5. I clicked “Save” and experimented but chose not to close down the window, just in case I was not happy with the results.

 6. I then went to Maya to try on the normal map to see what’s it like and continued by going into the bump mapping option in the material menu and pressed “File” to search for the normal map.
Ahhh! Not happy with results. It seems to have picked up a large amount of the wood grain in my texture and where I had pen marked in the textures it picked up every stroke of the brush. (trial and error)

7. When in doubt look online! I found a handy website that tells me the function of the Ndo menu. I found the function “Make sculpt layer” I was impressed. I could fully customise the normal map to my liking and learnt to smooth out the normals so it didn’t get that nasty sketch look. I felt at home using the Photoshop brushes and tools to just hand paint what I want to stand out. It’s slowly coming along but unfortunately time is a major factor for hand drawn art. But it gets results in a render.


 8. This is what it looks like coming out of “Make sculpt layer” and teaching me on how the normal map is formed.
Out of sculpt mode into the Ndo menu, save and then render it in Maya for the result.

9. The clock face was a big challenge and after all this hard work I’m still not totally happy with it. I might tackle this later because I am having trouble mastering the Ndo techniques. Taking a personal note* I should have gone for a simpler clock face design…

 10. I changed the martial of the clock back into Blin and kept on rendering it to get a good polished look.
Image size mess up!
11. Went back to normal Mapping and applied the same technique of hand drawing with the pressure brush and smoothing it with the blur tool after. In the screen shot it shows the clock in sculpt mode and then back into normal menu.


12. I found that I could copy my colour texture above the sculpt layer and then overlay and turn down opacity to be a guideline for normal mapping.


 13. It was then time to move on to the feet and side arches and try and get them just right. I applied a 100 opacity brush on the arch bricks and then erased it so it didn’t stick out too much.


 Render scene and final touches were going to be carried out next but time was of the essence and I might not be able to do it as I really don’t think I have the time to do the other two for my project of self discovery.

Nouvic Clock Journey Part 6

Alpha texturing clock hands and normal maps the traditional process.

1. I measured the right length of the hands of the clock face. I then got started on creating a block map followed by me creating a box, extruding it to make a semi circle and then shrinking the faces on top to form a bevelled look.
2. I continued the process and sized the vertexes in order for it to be a sharp point.

 3. I then used the “Insert edge loop” function and started to size the edge loops to a symmetrical curve. I continued the process down the hand.

 4. After getting the outer shape I wanted I then extruded the inside of the face to shape the holes and make sure it looked bevelled.

5. To make a similar small hand I duplicated the big hand and selected specific vertexes to shrink the hand.

6. I quickly made a bolt to resemble the pivot that the hands rotate on by making a cylinder and extruding the top.

 7.UV Map both hands using the y axis and put them to the side. I then positioned the UV maps over the single faced UV’s, so later when I projected the normal map it was correctly positioned on the single faced panels.


 8. The time then came to normal map the clock hands by going into the “Rendering” category, selecting Lighting/Shading” and clicked “Transfer Maps…”
 9. This took me to a menu, the first thing to do was to press the normal map icon to bring up options. Select a file location, Targa file and change the “Match Using” to surface normals. I then got into the Maya Common Output options to set up the resolution size and quality of baking.

10. The next step was to set up the backing process. First I selected the single panels and then clicked on “Add Selected” in the target mesh. I then highlighted the high poly meshes and clicked on “Add Selected” to the source mesh. I would then change the display to both and then the distance of the red envelope (Making sure it is as close as possible to the high poly mesh.). 

11. This is the end result and it can be seen in the ‘high quality mode’. Whilst rotating around the single panels the light changes to give it a 3D effect. Wherever I saved the normal map to (usually in the project source images) it would look like the colours of heat vision.


12. Then using the normal map as a template I used it as a guideline for the texture.

 13. I then close to use the magic wand tool to highlight were it will be see through. I changed the channel and created a new layer (default name will be alpha). With the areas still selected I filled right clicked and reversed selection in order for me to highlight the clock hand. I filled the hands with 100% opacity white in order for it to be transparent (Using a lower opacity will make it visible but slightly transparent depending on opacity.).

14.
I overlaid the grey normal map and then drew in slight highlights. After that I had an idea to add a slight different design to it using yellow and dark yellow to define shape.

 15. This will have to do for now but I am thinking of turning it to black so it doesn’t blend in with the clock face.

Nouvic Clock Journey Part 5

Texturing


1. UV Screenshot, the UV map. This will bring up options of what resolution size I want to save the file as.


2. This is what it will look like and so for the other UV maps I repeated the process twice.

 3. I wanted to find the right photo texture by using my own camera to get the right texture for my wooden clock. I encountered problems because all the furniture I found had a bad shine on the surface because of the polish. So I asked a friend to sand down an old piece of oak in order for me to take a picture of it. I chose old oak because it was a hardwood similar to walnut. I also learnt that softwood has larger spaces between the age rings than hardwood.    


4. I then chose a Lambert made clock to begin with and to see what it’s like when shown in Maya with the default lighting.

5. Just for a quick reference I quickly made a rendering scene. It contains two directional lights and an ambient light. First directional light will be the main light that will cast the shadow and the Second will lighten the other side slightly. The ambient light will be placed slightly behind in order to have some light from behind. I would then after the shadow setting for the main light in order to lighten the shadow to my satisfaction.

 6. I then carried out an extra rendering setting by turning off the default lighting and changing the resolution of render. I would then set the lights, the main clock, scene, experimental clocks, bits and bobs and other clocks on separate layers (I could assign a colour to them so the wireframe will change the colour).


For reinsurance I turned down the resolution temporarily whilst testing the render to produce quicker results.


 7. I changed the material to Blin for experimental reasons and started to experiment with the reflectivity and how shiny I needed it (I don’t need much).

 8. Trial and error. Over a few minutes I quickly sorted out a temporary rendering set up. I added a shadow, changed the shadow to become lighter and added a slight tint of yellow and get the shadow just about acceptable. 


9. More trial and error took place to get the lighting just right. At this point I went back into Photoshop and changed the wood texture to be a little lighter.

10. The temporary final Render in Maya software.

11. I put the wireframe lines on a separate layer and use them as guidelines (guidelines that you have to follow unless it’s an alpha then you don’t have to.)

 12. After making a sketch of the wood grain texture I went back into Maya to see what it would look like. I will be doing this a lot because its gives me instant feedback of what it will be like and how the light effects it.
13. At this time I managed to sketch out the main parts of the clock and using these sketches as references. As that moment in time I felt like I was really drawing on a piece of wood this reminded me of woodwork class.

 14. I started to roughly sketch the main clock face, using the duplicate tool to make the design symmetrical.
 15. I used the sketch as a guideline and made a yellow circle for the clock, as I always remind myself at this stage to put on colour before going straight into detail because its important getting the base colour down. The reason while I’m not using a photo image of a clock face its that it adds unwanted shine to it and it would not be my own design.


16. My next step was to use the Bevel and Emboss tool to get the right shadow and a little shine and then merge it with an empty layer. Naturally I would see what’s it like in Maya.

17. Next was to paint the feet gold. I quickly painted it and then shaped it by using the wireframe as a guide.

 18. I made separate layers for the golden face and when I was happy with the colour I merged the layers.


19. I then went into a little detail adding sharpness to the clock. I did this by adding a very light yellow and a very dark yellow to define distance of light and dark (light close to and dark a distance away to back up the light sections.).

 20. Inspiration! During a trip to a sculpture park I found an interesting tree that looked like it was made up of warped branches this reminded me of an art nouveau clock design. I felt like I have done too much gothic design and so I decide to change the design to more of a whiplash design. First I change the properties of my brushes to be more pen pressure sensitive to give a good appreciation of depth.


As you can see I rubbed it all out and followed my vision. I had an extra idea to add a symbol that resembles gothic in the centre and to be perfectly honest I’m beginning to slowly like this design.

 21. After the big design change I had a looked in Maya and liked what I saw. So I applied the design to the front keeping in mind the gothic symbol.

22. Then I designed the back of the clock and thought about the main mechanics of the clock, it being a working object that would need maintenance to keep it running. I therefore put in a back panel and a gold coloured hole to give the impression that it could be wound up.


23. I returned to drawing out the clock face by duplicating one of the detailed pattern and rotating it by way of a pivot in order to get the same amount of detail.
24. I always take the zoom back to see what’s it like from a distance and to check if I have gone out of the wireframe, I made some quick finishing touches to get the clock number panels forward.

 25. Continued to detail the gold, it was a challenge to get the gold just right but I still feel the gold doesn’t look right. I have used gold reference, so I guess it’s a learning curve which I haven’t fully grasped yet.

26. Whoops! forgot to do the inside leg of the clock. This was a pain because I had to line it up with the archways.

27. I figured that I would bear in mind the wireframe and use the edges on the mesh as the bevel of the tile work. To save time I added a bevelled brown line at the edge so it didn’t matter if it did not line up exactly.

 28. Just to add more of a definition I added a slight gradient onto the bevel edges.

29. A little tint of orange, it looks better but hmm…

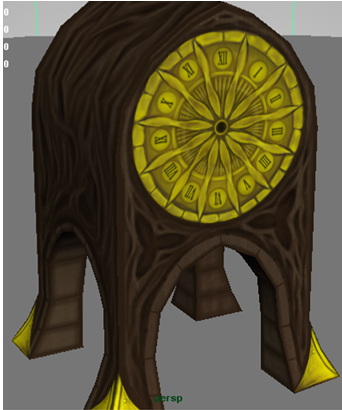
 30. Final touches. I started to add the numbers on the clock face. I decided to go down the gothic route of using roman numerals. I looked carefully at a roman numeral clock I had in my hand and found that the numbers were more stream lined. I thinned the numbers and rotated them around the clock as they were traditionally donw on an gothic clocks.

 I just had to look at what it looked like in Maya.